Monday, March 16, 2020

How not to get coronavirus


Do you plan on traveling abroad soon? Does anyone in your family have an underlying respiratory condition? Are you frequently around people who have poor sanitation tendencies? All these things are stuff to keep in mind when dealing with coronavirus or (COVID-19). 

What is Coronavirus?

Coronavirus is an infectious disease caused by SARS or severe acute respiratory system. It is spread just like influenza through respiratory droplets entering the eyes, mouth, and noes. The virus is mainly spread from person to person,
,but this coronavirus originates from a virus that is found in bats. As of 3/10/19 there have been 118,905 cases of the coronavirus worldwide along with 4,269 deaths. Primarily the deaths have come from older people who already had existing medical conditions but still a very ferocious disease none the less. The symptoms include fever, shortness of breath, and cough. Pressure or pain in the chest is also a commonly reported symptom.

Prevention steps at home

In order to fight against this disease and make sure the people around you don't get it starts with just a simple understanding of cleanliness.


  • Have supplies on hand. Stock plenty of medicine, tissues, and food.
  •  Make sure persons in household are educated and aware of this virus and are taking the appropriate steps needed. Even if you are staying clean the people around you have a large impact on whether you get this disease.
  • Wash hands whenever you get the chance to especially after using them on surfaces where other people have touched.
  • Use Kleenex wipes on hard surfaces that are touched frequently (tables, doorknobs, lights, computer keyboards).
  •  Create a designated room in the event where someone in your household does get sick and make them stay there to limit the number of germs spread. 

Be self-aware

If you have had a past with respiratory issues, heart, or even diabetes you are at a higher risk of dying from this virus. 
  • When going into the public, stay away from large crowds 
  • Avoid non-essential traveling especially by airplane or cruise ship
  • Staying inside is the best option to staying safe if there is worry about the diseases effect

How often and properly to wash hands properly

The Center for Disease Controls says that the number 1 way to prevent from getting the coronavirus is to just wash your hands. A simple and quick prevention method that can potentially save your life or somebody else's. Surprisingly not many people know how to wash your hands properly, so I am going to tell you how:


  1. Wet your hands with clean, running water, and apply soap.
  2. Rubs hands together with soap in hand along with the backs of your hands, between your fingers, and under your nails. It is important to scrub every little nook and cranny of the hand.
  3. Scrub your hands for at least 20 seconds. If you need a timer, hum the “Happy Birthday” song from beginning to end twice.
  4. Rinse your hands well under clean while still rubbing them together under clean running water.
  5. Dry your hands using a clean towel or air dry them.

Prevention steps abroad 

Beginning Friday March 13th, The United States government announced that travel is suspended from the European Union to help contain the spread of coronavirus.
  • Be aware of your surroundings especially in a country that you are not completely familiar with. 
  • Having knowledge of how the situation is at the country you are traveling to is key. Traveling to hot spots where the virus is not recommended.
  • Again, practice cleanliness no matter where you are or if you’re on vacation or not. The best way to not catch this disease is to keep it from manually entering your body.
  • Have common sense. The federal government would not have suspended travel completely if it wasn't a big seal.
  • If you recently returned travel from out of the country the CDC recommends self-quarantining for 14 days. Symptoms of this virus make take a few days to set in so you could be a carrier and not even know it.

In case of an emergency

If worst comes to worst and you contract this contagious disease, it is important to take the proper steps in containing it and making sure none of your loved ones get it either.


  • Create a designated room in the event where someone in your household does get sick and make them stay there to limit the number of germs spread.
  • Cover coughs and sneezes with tissues and or shoulder area with proper clothing.
  • Stay at home! Everybody needs to do their part in containing this virus.
  • Wear a face mask while quarantined. It is important to not even breath on anybody because this virus is air born so keep a good distance as much as possible.
  • Cheer up because this is history. You will more than likely be fine and you get to tell your future children you survived a disease that caused global pandemic.


Sunday, March 15, 2020

How to Gain Muscle for Your Arms


If you are like me, you want bigger arms or you are always trying to physically better your body. Today I will tell you how to get bigger arms. In this informational essay I will cover many different topics. Which include what you should eat, which exercises you should do for gains. I will also give some other tips that have worked for me when I was trying to put on muscle mass.

Let’s start with what you should eat:

There are certain types of food that you could eat in order to help you build muscle. Some of these are things such as fish, chicken, eggs, and other healthy fatty foods. The reason you should eat these certain types of food is because they are healthier than most foods. Why? Because they are rich in protein and in order to gain muscle mass you need to intake protein. They also have vitamins that will help you stop from gaining more fat.
Another thing that you should keep in consideration is that you should not eat more fat based calories than you are burning off. Because if you take in more fat-based calories than you can burn it ends up turning it into fat and that is not what you want. If you are trying to add bulk onto, your body than you could take in a bit more calories than you are supposed to. Just make sure the calories are from healthy foods. Do not eat before you work out wait after you work out, so you won’t feel like you are bloating.
It will also make the food taste better because it feels like you earned it. Now let’s talk about snack replace things such as brownies ad other deserts for healthier treats such as yogurt, granola bars, nuts and other healthier snacks. Another thing is you should drink plenty of water throughout the day so you can hep your body process the food faster and pee out all the waste and fat out. It will also help hydrate your body and metabolism out. Try to eat eggs three times out of a week but in the morning why? Because in the morning if you eat eggs it helps start up your metabolism early in the morning.
It is also a great source of protein and fat burner. Another thing is try not to eat at night if you do remember to eat something healthy.
Image result for protein foods

  • Next Topic is Which exercises you should do to put on some gains:


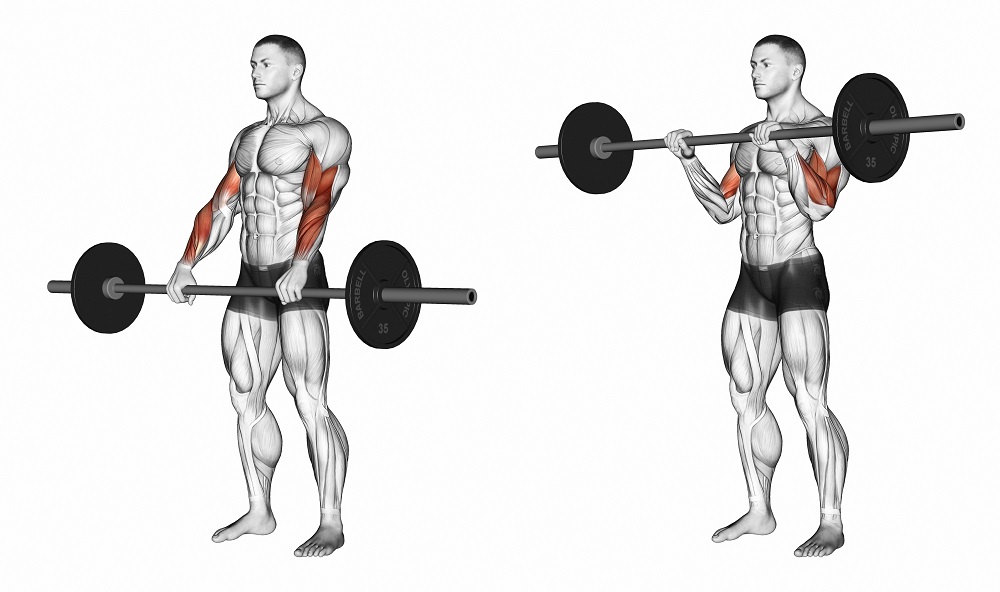
The Curl Bar: One of my favorite exercises to gain muscle mass on my arms is doing curls with a curl bar. The reason is because you put more pressure on your arms. The way you do them is you stand up straight with the bar resting by your hips and arms extended. Then you curl the bar until it reaches your shoulders. One mistake people usually do when performing this work out is that they lift with their body. While preforming the exercise the only thing that you should be moving is the forearms. This exercise helps build muscle for your biceps.
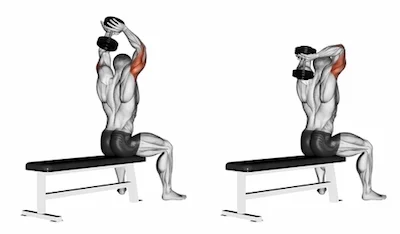
The next work out is Overhead triceps extension: This workout as the name says it primarily focuses on working out your triceps. The way you preform this work out is you sit down in a workout seat. Grab one dumbbell that you can lift with both arms. Put the dumbbell behind your head let it rest and then finally push both arms up towards the ceiling until they are fully extended then repeat. The combination of both workouts will help you start gaining muscle in the right places so you can see progress you can also feel the burn while doing them.
Image result for arm dumbell triceps extension sitting
Image result for arm curl bar muscles worked out

Last Topic is the tips from me:

Let me start off by saying do not work out too much because your muscles need time to heal themselves up. Take lots of protein but not more than you can burn off. You can take things such as protein shakes and other types of supplements, but personally I get my protein from foods I’m all natural and I have never taken any supplements. Next is get lots of sleep to allow your muscles to relax and repair themselves from a long day at the gym. The minimum amount of hours you should sleep that I recommend is eight to nine.
Drink lots of water to help you get the waste and fat out. It will also help you get cut getting cut is another way of saying you can start to see your muscles more. Now the way I work out is less weight more reps why you may ask it is because it may be easier but after a while you will feel that burn it helps you get shredded. It also tricks your muscles and mind to think that you are doing a lot more weight than you are. More weight less reps helps you put on muscle and strength, but you will see that your muscles won’t get as toned.


Preparing for an AFJROTC drill meet

There are many things you must do to prepare for a drill meet. These also differ depending on what team you’re on. This will be a quick guide on the various tasks that need to be done in preparation for your next drill meet.

Teams


There are the armed teams and unarmed teams, of which both are divided into four more teams. They are divided into regulation, exhibition, inspection, and color guard. The armed team is comprised of the teams focused utilizing the rifles in their routines. I feel I must stress for those interested in joining drill team that the rifles are not real; they are incapable of shooting and calling them “guns” is frowned upon. Meanwhile, the unarmed team is comprised of the teams who simply do not utilize rifles in their routines, focusing more on their ability to follow commands and execute movements precisely and in sync with everyone else.

Regulation

These teams are each then broken into four more teams. The regulation teams are given the same routine as every other schools’, long before the drill meet. They must practice this routine and be able to perform it without stepping bounds and going past the time limit. This event focuses on your ability to perform the fundamentals of drill.

Exhibition

The next team is the exhibition team. These teams are to come up with their own routines, with unique commands and maneuvers permitted. The unarmed team is most often utilizing their hands and heels to put emphasis on certain movements through sound. The armed team uses their rifles to show off their abilities. This event focuses on your creativity and teamwork.

Inspection

Now we have the inspection teams. These teams most endure a barrage of questions from the judges. They will ask a large variety of questions that you are expected to know, as well as go over your uniform (as well as rifle for armed) with a fine brush. This event focuses on your general knowledge and ability to maintain your uniform.

Color guard

Finally, we have the color guard team. The color guard consists of four cadets. They are given the same routine as the other schools. The color guard teams have the same equipment, two flags and two rifles. It doesn’t matter if they are armed or unarmed. The focus of this event is to show your ability to follow commands and perform movements in a tight space, while also giving respect to our nation’s, and state’s, flags.

Gear 


The drill team has a wide array of gear to prepare for their competitions. Some teams will have you maintain all your own gear, while others will have a support team maintain some of your gear. The gear you have will be dependent on which team you join. Armed team will have their rifles. Color guard teams will have their rifles, flags, and harnesses for the flags. The unarmed team lacks these distinct items, but they often have higher standards for their uniforms.

Uniform

The main thing, which all teams must have prepared, is the uniform. You can’t exactly march half naked after all. There are several aspects of the uniform to consider. The shoes must be properly polished. The pants, blue shirt, service coat, flight cap, preferably the lightweight coat, and any additional items your team decides to include (e.g. berets), all of these must be pristine and as wrinkle free as possible. The ribbons, ranks, and any badges should be properly aligned and shown.

Shoes should be properly brushed and shined. This is especially true for the inspection team. For shining, you will need some cotton balls, some black wax, a brush, and some water. You can find bags with all of these items for sale in different stores, I’ve personally had the best luck at Walmart. The first step is to take your brush and brush down your shoes. Your goal is to get all the dirt and sand off of your shoes and make it as clean as possible before you start the actual shining part of this process. Once this is done, you should put some wax on one of your cotton balls. I cannot stress this enough, do not go up and down, or side to side with the wax on your shoes. You should apply the wax using spiral movements. Remember what Kesuke Miyagi said, wax on, wax off. It’s the same idea as the movie. You can find an endless array of videos on YouTube if you don’t understand the motion. Then take your brush and go over the shoe again. Now take another cotton ball and wet it in the water and go over the shoe. Repeat this process till you can see your reflection.

Flags and rifles

As far as everything else, you should seek further research for more involved instructions but the basics is to maintain rifles and flags. Rifles need to be kept free of any rust and need to make sure bolts are properly tightened. If failed to do so they could fall apart and hurt someone.  The flags are a bit easier, they need to be properly ironed before any events to keep them free of all wrinkles.

how to complete a prom makeup look

How to complete a prom makeup look 

What you need to know about makeup 
 Makeup is cosmetics such as foundation, concealer, mascara, lipstick, or eyeshadow used to enhance one's appearance. Makeup is a form of art mastered by many people. In order to complete this makeup look, there are many things you need to know and steps to follow. Everyone has a personal preference on how to start the makeup process and in what order they apply the makeup. Throughout this article I will be explaining how to complete a prom makeup look.   

Know your skin type 
In order to begin this process, you will need to know what type of skin you have. Understanding if your skin produces more oil or does not produce enough will guide you on what types of products you will need to use.  

Prepping your skin 
It is very important to start off with a clean face. This will help avoid your makeup to look cakey by removing any dirt underneath your skin. To prep your skin, use a face cleanser suitable for your skin type. Understanding how each cleanser works will help you pick one that is right for you. After using a face cleanser, you will need to apply a toner. A toner is a water- based liquid that offers extra cleaning and helps remove anything your cleanser did not remove. Then you will need to moisturize your face. The moisturizer you use will also go according to your skin type. Although there are different categories it all comes down to personal preference and which one works best for you. 

Dry skin 
Having dry skin means you may have a rough complexion. Your skin could peel, itch, crack, or become irritated. If you have dry skin it is best to use a cream cleanser. The creamy formula consists of natural oils that cleanses the skin leaving you with fresh and hydrated skin. After cleansing your face, you want to moisturize. The best moisturizer for dry skin is something with a thick consistency. Avoid using moisturizers with alcohol, as they will only dry out the skin more. Skipping this step could cause your makeup to look clumpy, or it could cause your skin to look flakey. 

Oily skin 
Having oily skin means you may have a shiny complexion. Your skin could be more prone to acne and you may also have large pores. If you have oily skin it is best to use a foam cleanser. The foam is meant to deep clean the skin and remove any excess oil and any dirt stuck in your pores, helping your skin feel clean and fresh. After cleansing, you want to apply a lightweight moisturizer. You do not want to skip moisturizer altogether because this could cause more oilsYou do not want to apply a moisturizer with a thick consistency, as it will only cause your face to look greasy. 

Combination skin 
Having combination skin means your skin may be dry or normal in some areas and oily in others, such as the T-zone. The T-zone consists your nose, forehead, chinIf you have combination skin it is best to use a gel cleanser. The gel has a thick consistency that provides a smaller amount of foam and gentle cleanse. To moisturize combination skin, you could use a lightweight moisturizer in your T-zone and a ticker moisturizer for the rest of your skin. 

Eyebrows  
Filling in your eyebrows is very simple. All you need is an eyebrow pencil or a dip brow pomade, an angled brush, and a spoolieI will be explaining how I prefer to fill in my eyebrows. To fill in your eyebrows and define them you will need to: 
  1. 1. Start off by outlining the bottom of the eyebrow using an angled brush 
  1. 2. Using the same brush, blend the product upwards 
  1. 3. Continue by outlining the top of the eyebrow 
  1. 4. Using the angled brush, fill in the eyebrow 
  1. 5. Blend out the eyebrow using a spoolie 
  1. 6. Finally, clean up the outside of the eyebrow using concealer  

Eyeshadow  
The most important part of this process is the eyeshadow. This will be what stands out. I will be explaining how to do more of a dramatic eyeshadow look. To do this type of look you will need to follow these steps: 
  1. 1. You will need to prime the eyelids 
  1. 2. Set it with a translucent powder 
  1. 3. Start applying a light shade above the crease of the eyelid 
  1. 4. Apply a darker shade on the crease of the eyelid 
  1. 5. Blend the two colors into each other 
  1. 6. Cut the crease halfway using concealer 
  1. 7. Pat white shadow on top of the cut crease 
  1. 8. Add the dark shade at the end of the cut crease 
  1. 9. Apply glitter primer on the cut crease  
  1. 10. Apply glitter to the cut crease and wait for it to dry 
  1. 11. Then you are going to do a winged eyeliner 
  1. 12. Apply mascara and eyelashes 
 

 Primer     
Using a primer before applying your makeup has many benefits. One of the main benefits is that it seals your pores. Applying foundation without using primer could make your pores more visible. Primer will give your makeup a much more smother effect. It will also help your makeup stay on longer 

Know your undertones  
Knowing your undertone is very important. This refers to the colors underneath the surface of your skin. There are three different undertones: warm, cool, and neutral. This will help you find what shade of makeup looks best on you. 

Warm  
A warm undertone appears to have a yellow or golden tone. 

Cool  
A cool undertone appears to have hints of blue, pinks, or a slight of a red complexion. 

Neutral  
A neutral undertone has a mixture of the two 

Concealing blemishes and dark spots 
When concealing blemishes and dark spots, you will need to find the correct color corrector for your skin tone.  

Pink  
Pink color corrector will help blur over any dark spots.  

Orange 
Orange color corrector will help cancel out any dark spots on dark skin tones 

Yellow   
Yellow color corrector will help correct pink and mild redness, typically around the nose and mouth  

Lavender   
Lavender color corrector will help neutralize any yellow areas  

Green  
Green color corrector will help neutralize any redness and it usually used to cover up acne or skin sensitivities   

Foundation  
Foundation is a liquid or powder that can be applied to the face to help give the complexion an even and flawless lookChoosing the right foundation depends on your skin tone and texture. When using a liquid foundation, you can apply it with a brush or a makeup sponge. When using a makeup sponge, it is best to wet the sponge before using it. This will make the application easier and make it look smoother. 

Sheer coverage    
A sheer coverage foundation is a lightweight foundation that gives the least amount of pigment. This can minimize contrast and discoloration in skin.  

Light coverage  
light coverage foundation can help cover up uneven and slight blemishes. 

Medium coverage    
A medium coverage foundation will cover up freckles, discolorations, blemishes, and acne scars. 

Full coverage 
A full coverage foundation is very opaque and can help cover up birthmarks, hyper pigmentation, acne, acne scars, and other unwanted imperfections. 

Concealer   
Once you have applied your foundation you are going to want to apply concealer underneath your eyes, and on the T-zone. Your concealer should be around one or two shades lighter than your foundation. 

Contour   
Contouring is a technique that will help sculpt the structure of your face. This is usually one or two shades darker than your skin tone. You will apply this on the temples of the forehead, beneath your cheekbones, sides of your nose, underneath the chinand jawline. Blending is very important in this process. 

Setting powder  
A setting powder is used to lock in foundation and concealer. There are different types of setting powders. The setting powder will not work if you use the incorrect one or use it the incorrect way.  

Mineral powder 
This powder is supposed to replace medium coverage foundation. Using this over full coverage foundation will leave it looking cakey. 

Loose Translucent setting powder 
This powder sets the face without changing the color of the foundation. 

Loose colored setting powder 
This powder corrects tone, brightens the face, and corrects redness of the face. 

Pressed powder 
This powder adds more of a coverage and polished look to the skin when applied. 

Blush 
When applying blush, you want to start at the apple of your cheeks and sweep it up towards your hairline.  

Highlight   
Highlight is basically the opposite of contouring. It is applied on your cheekbones, along the brow bones, and the bridge of your nose. There are three types of highlight. You can pick one according to your skin type or your personal preferenceMake sure to blend the highlight out. 

Creamy  
A creamy highlighter works best on dry skin. This can be applied before or after foundation. This highlight is best applied using your finger. 

Powder  
powder highlighter is best on oily skin. This should be applied last in the makeup process. This highlight is best applied using a brush. 

Liquid   
liquid highlighter can cause the foundation to break underneath, so it is best to apply this before applying foundation. This highlight is best applied using a brush.  

Setting spray  
A setting spray is used at the end of the makeup process. This will help the makeup stay on longer throughout the day. If a setting spray is not used, it could cause the makeup to appear cakey due to sweat. The spray allows the layers of makeup stay in place.  

Should the US government give bailouts to various cruise corporations?

In recent news, the world has been impacted by a virus called COVID-19 that has left tremendous effects on many of the world’s countries as ...

Popular Posts